
Info alert:Important Notice
The Open Data Hub documentation and the opendatahub-documentation repository are archived as of March 2026. To see the latest documentation, go to: Red Hat OpenShift AI Self-Managed documentation.
Getting started with Open Data Hub
Table of Contents
Overview
Open Data Hub is an artificial intelligence (AI) platform that provides tools to rapidly train, serve, and monitor machine learning (ML) models onsite, in the public cloud, or at the edge.
Open Data Hub provides a powerful AI/ML platform for building AI-enabled applications. Data scientists and MLOps engineers can collaborate to move from experiment to production in a consistent environment quickly.
Data science workflow
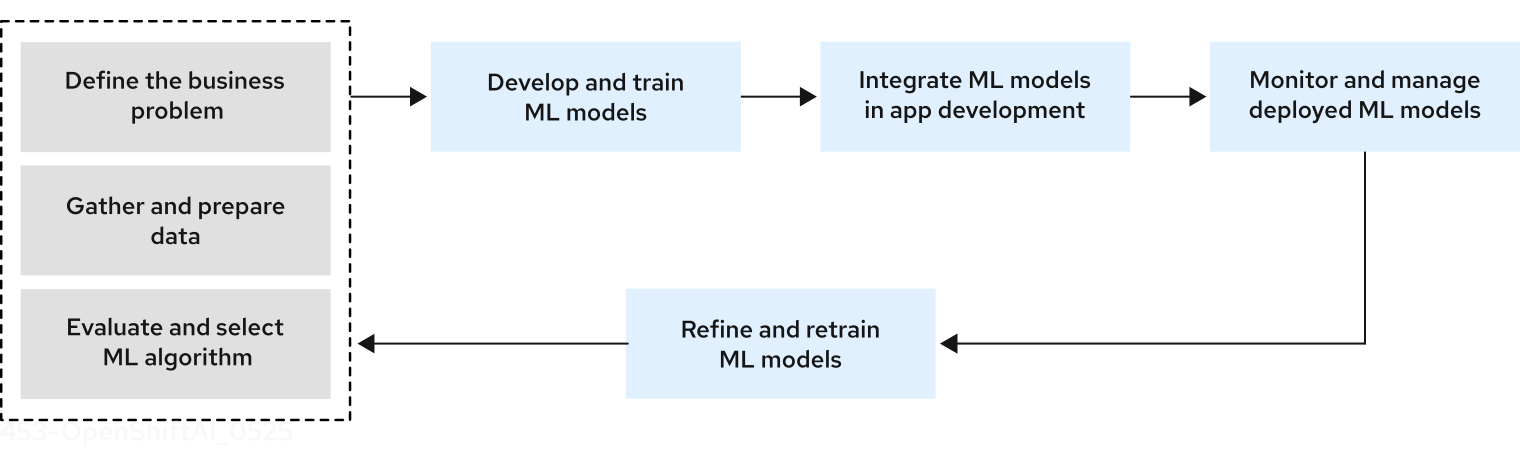
For the purpose of getting you started with Open Data Hub, the following figure illustrates a simplified data science workflow. The real world process of developing ML models is an iterative one.
Figure 1. Simplified data science workflow
The simplified data science workflow for predictive AI use cases includes the following tasks:
-
Defining your business problem and setting goals to solve it.
-
Gathering, cleaning, and preparing data. Data often has to be federated from a range of sources, and exploring and understanding data plays a key role in the success of a project.
-
Evaluating and selecting ML models for your business use case.
-
Train models for your business use case by tuning model parameters based on your set of training data. In practice, data scientists train a range of models, and compare performance while considering tradeoffs such as time and memory constraints.
-
Integrate models into an application, including deployment and testing. After model training, the next step of the workflow is production. Data scientists are often responsible for putting the model in production and making it accessible so that a developer can integrate the model into an application.
-
Monitor and manage deployed models. Depending on the organization, data scientists, data engineers, or ML engineers must monitor the performance of models in production, tracking prediction and performance metrics.
-
Refine and retrain models. Data scientists can evaluate model performance results and refine models to improve outcome by excluding or including features, changing the training data, and modifying other configuration parameters.
About this guide
This guide assumes you are familiar with data science and ML Ops concepts. It describes the following tasks to get you started with using Open Data Hub:
-
Log in to the Open Data Hub dashboard
-
Create a project
-
If you have data stored in Object Storage, configure a connection to more easily access it
-
Create a workbench and choose an IDE, such as JupyterLab or code-server, for your data scientist development work
-
Learn where to get information about the next steps:
-
Developing and training a model
-
Automating the workflow with pipelines
-
Implementing distributed workloads
-
Testing your model
-
Deploying your model
-
Monitoring and managing your model
-
Glossary of common terms
This glossary defines common terms for Open Data Hub.
- accelerator
-
In high-performance computing, a specialized circuit that is used to take some of the computational load from the CPU, increasing the efficiency of the system. For example, in deep learning, GPU-accelerated computing is often employed to offload part of the compute workload to a GPU while the main application runs off the CPU.
- artificial intelligence (AI)
-
The capability to acquire, process, create and apply knowledge in the form of a model to make predictions, recommendations or decisions.
- AI pipelines
-
A workflow engine that is used by data scientists and AI engineers to automate pipelines, such as model training and evaluation pipelines. AI pipelines also includes experiment tracking capabilities, artifact storage, and versioning.
- bias detection
-
The process of calculating fairness metrics to detect when AI models are delivering unfair outcomes based on certain attributes.
- custom resource (CR)
-
A resource implemented through the Kubernetes CustomResourceDefinition API. A custom resource is distinct from the built-in Kubernetes resources, such as the pod and service resources. Every CR is part of an API group.
- custom resource definition (CRD)
-
In Red Hat OpenShift, a custom resource definition (CRD) defines a new, unique object
Kindin the cluster and lets the Kubernetes API server handle its entire lifecycle. - connections
-
A configuration that stores the parameters required to connect to an S3-compatible object storage, database or OCI-compliant container registry from a project.
- connection type
-
The type of external source to connect to from a project, such as an OCI-compliant container registry, S3-compatible object storage, or Uniform Resource Identifiers (URIs).
- project
-
An OpenShift project for organizing data science work. Each project is scoped to its own Kubernetes namespace.
- disconnected environment
-
An environment on a restricted network that does not have an active connection to the internet.
- distributed workloads
-
Data science workloads that are run simultaneously across multiple nodes in an OpenShift cluster.
- fine-tuning
-
The process of adapting a pre-trained model to perform a specific task by conducting additional training. Fine tuning may involve (1) updating the model’s existing parameters, known as full fine tuning, or (2) updating a subset of the model’s existing parameters or adding new parameters to the model and training them while freezing the model’s existing parameters, known as parameter-efficient fine tuning.
- graphics processing unit (GPU)
-
A specialized processor designed to rapidly manipulate and alter memory to accelerate the creation of images in a frame buffer intended for output to a display. GPUs are heavily utilized in machine learning due to their parallel processing capabilities.
- inference
-
The process of using a trained AI model to generate predictions or conclusions based on the input data provided to the model.
- inference server
-
A server that performs inference. Inference servers feed the input requests through a machine learning model and return an output.
- large language model (LLM)
-
A language model with a large number of parameters, trained on a large quantity of text.
- machine learning (ML)
-
A branch of artificial intelligence (AI) and computer science that focuses on the use of data and algorithms to imitate the way that humans learn, gradually improving the accuracy of AI models.
- model
-
In a machine learning context, a set of functions and algorithms that have been trained and tested on a data set to provide predictions or decisions.
- model catalog
-
A curated library where data scientists can discover and evaluate the available generative AI models to find the best fit for their use cases.
- model registry
-
A central repository containing metadata on machine learning models from inception to deployment. The metadata ranges from high-level information such as the deployment environment and project origins to specific details like training hyperparameters, performance metrics, and deployment events.
- model server
-
A container that hosts a machine learning model, exposes an API to handle incoming requests, performs inference, and returns model predictions.
- model-serving runtime
-
A component or framework that helps create model servers for deploying machine learning models and build APIs optimized for inference.
- MLOps
-
The practice for collaboration between data scientists and operations professionals to help manage the production machine learning (or deep learning) lifecycle. MLOps looks to increase automation and improve the quality of production ML while also focusing on business and regulatory requirements. It involves model development, training, validation, deployment, monitoring, and management and uses methods like CI/CD.
- notebook interface
-
An interactive document that contains executable code, descriptive text for that code, and the results of any code that is run.
- object storage
-
A method of storing data, typically used in the cloud, in which data is stored as discrete units, or objects, in a storage pool or repository that does not use a file hierarchy but that stores all objects at the same level.
- OpenShift Container Platform cluster
-
A group of physical machines that contains the controllers, pods, services, and configurations required to build and run containerized applications.
- persistent storage
-
A persistent volume that retains files, models or other artifacts across components such as model deployments, AI pipelines and workbenches.
- persistent volume claim (PVC)
-
A persistent volume claim (PVC) is a request for storage in the cluster by a user.
- quantization
-
A method of compressing foundation model weights to speed up inferencing and reduce memory needs.
- serving
-
The process of hosting a trained machine learning model as a network-accessible service. Real-world applications can send inference requests to the service by using a REST or gRPC API and receive predictions.
- ServingRuntime
-
A custom resource definition (CRD) that defines the templates for pods that can serve one or more particular model formats. Each ServingRuntime CRD defines key information such as the container image of the runtime and a list of the model formats that the runtime supports. Other configuration settings for the runtime can be conveyed through environment variables in the container specification. It also dynamically loads and unloads models from disk into memory on demand and exposes a gRPC service endpoint to serve inferencing requests for loaded models.
- vLLM
-
A high-throughput and efficient inference engine for running large-language models that integrates with popular models and frameworks.
- workbench
-
An isolated environment for development and experimentation with ML models. Workbenches typically contain integrated development environments (IDEs), such as JupyterLab, RStudio, and Visual Studio Code.
- workbench image
-
An image that includes preinstalled tools and libraries that you need for model development. Includes an IDE for developing your machine learning (ML) models.
- YAML
-
A human-readable data-serialization language. It is commonly used for configuration files and in applications where data is being stored or transmitted.
Logging in to Open Data Hub
After you install Open Data Hub, log in to the Open Data Hub dashboard so that you can set up your development and deployment environment.
Prerequisites
-
Open Data Hub is installed on your OpenShift cluster. For information, see Installing Open Data Hub.
-
You know the Open Data Hub identity provider and your login credentials.
-
If you are a data scientist, data engineer, or ML engineer, your administrator must provide you with the Open Data Hub instance URL, for example:
https:://odh-dashboard-odh.apps.ocp4.example.com
-
-
You have the latest version of one of the following supported browsers:
-
Google Chrome
-
Mozilla Firefox
-
Safari
-
Procedure
-
Browse to the Open Data Hub instance URL and click Log in with OpenShift.
-
If you have access to OpenShift Container Platform, you can browse to the OpenShift Container Platform web console and click the Application Launcher (
 ) → Open Data Hub.
-
-
Click the name of your identity provider, for example,
GitHub,Google, or your company’s single sign-on method. -
Enter your credentials and click Log in (or equivalent for your identity provider).
Verification
-
The Open Data Hub dashboard opens on the Home page.
Viewing installed Open Data Hub components
In the Open Data Hub dashboard, you can view a list of the installed Open Data Hub components, their corresponding source (upstream) components, and the versions of the installed components.
Prerequisites
-
Open Data Hub is installed in your OpenShift cluster.
Procedure
-
Log in to the Open Data Hub dashboard.
-
In the top navigation bar, click the help icon (
 ) and then select About.
Verification
The About page shows a list of the installed Open Data Hub components along with their corresponding upstream components and upstream component versions.
Additional resources
Creating a project
To implement a data science workflow, you must create a project. In OpenShift, a project is a Kubernetes namespace with additional annotations, and is the main way that you can manage user access to resources. A project organizes your data science work in one place and also allows you to collaborate with other developers and data scientists in your organization.
Within a project, you can add the following functionality:
-
Connections so that you can access data without having to hardcode information like endpoints or credentials.
-
Workbenches for working with and processing data, and for developing models.
-
Deployed models so that you can test them and then integrate them into intelligent applications. Deploying a model makes it available as a service that you can access by using an API.
-
Pipelines for automating your ML workflow.
Prerequisites
-
You have logged in to Open Data Hub.
-
You have the appropriate roles and permissions to create projects.
Procedure
-
From the Open Data Hub dashboard, select Projects.
The Projects page shows a list of projects that you can access. For each user-requested project in the list, the Name column shows the project display name, the user who requested the project, and the project description.
-
Click Create project.
-
In the Create project dialog, update the Name field to enter a unique display name for your project.
-
Optional: If you want to change the default resource name for your project, click Edit resource name.
The resource name is what your resource is labeled in OpenShift. Valid characters include lowercase letters, numbers, and hyphens (-). The resource name cannot exceed 30 characters, and it must start with a letter and end with a letter or number.
Note: You cannot change the resource name after the project is created. You can edit only the display name and the description.
-
Optional: In the Description field, provide a project description.
-
Click Create.
Verification
-
A project details page opens. From this page, you can add connections, create workbenches, configure pipelines, and deploy models.
Creating a workbench and selecting an IDE
A workbench is an isolated area where you can examine and work with ML models. You can also work with data and run programs, for example to prepare and clean data. While a workbench is not required if, for example, you only want to service an existing model, one is needed for most data science workflow tasks, such as writing code to process data or training a model.
When you create a workbench, you specify an image (an IDE, packages, and other dependencies). IDEs include JupyterLab and code-server.
The IDEs are based on a server-client architecture. Each IDE provides a server that runs in a container on the OpenShift cluster, while the user interface (the client) is displayed in your web browser. For example, the Jupyter workbench runs in a container on the Red Hat OpenShift cluster. The client is the JupyterLab interface that opens in your web browser on your local computer. All of the commands that you enter in JupyterLab are executed by the workbench. Similarly, other IDEs like code-server or RStudio Server provide a server that runs in a container on the OpenShift cluster, while the user interface is displayed in your web browser. This architecture allows you to interact through your local computer in a browser environment, while all processing occurs on the cluster. The cluster provides the benefits of larger available resources and security because the data being processed never leaves the cluster.
In a workbench, you can also configure connections (to access external data for training models and to save models so that you can deploy them) and cluster storage (for persisting data). Workbenches within the same project can share models and data through object storage with the AI pipelines and model servers.
For projects that require data retention, you can add container storage to the workbench you are creating.
Within a project, you can create multiple workbenches. When to create a new workbench depends on considerations, such as the following:
-
The workbench configuration (for example, CPU, RAM, or IDE). If you want to avoid editing the configuration of an existing workbench’s configuration to accommodate a new task, you can create a new workbench instead.
-
Separation of tasks or activities. For example, you might want to use one workbench for your Large Language Models (LLM) experimentation activities, another workbench dedicated to a demo, and another workbench for testing.
About workbench images
A workbench image is preinstalled with tools and libraries for model development. You can use the provided images, or an Open Data Hub administrator can create custom images tailored to your needs.
To provide a consistent, stable platform for your model development, many provided workbench images contain the same version of Python. Most workbench images available on Open Data Hub are pre-built and ready for you to use immediately after Open Data Hub is installed or upgraded.
The following table lists the workbench images that are installed with Open Data Hub by default.
If the preinstalled packages that are provided in these images are not sufficient for your use case, you have the following options:
-
Install additional libraries after launching a default image. This option is good if you want to add libraries on an ad hoc basis as you develop models. However, it can be challenging to manage the dependencies of installed libraries and your changes are not saved when the workbench restarts.
-
Create a custom image that includes the additional libraries or packages. For more information, see Creating custom workbench images.
| Image name | Description |
|---|---|
CUDA |
If you are working with compute-intensive data science models that require GPU support, use the Compute Unified Device Architecture (CUDA) workbench image to gain access to the NVIDIA CUDA Toolkit. Using this toolkit, you can optimize your work by using GPU-accelerated libraries and optimization tools. |
Standard Data Science |
Use the Standard Data Science workbench image for models that do not require TensorFlow or PyTorch. This image contains commonly-used libraries to assist you in developing your machine learning models. |
TensorFlow |
TensorFlow is an open source platform for machine learning. With TensorFlow, you can build, train and deploy your machine learning models. TensorFlow contains advanced data visualization features, such as computational graph visualizations. It also allows you to easily monitor and track the progress of your models. |
PyTorch |
PyTorch is an open source machine learning library optimized for deep learning. If you are working with computer vision or natural language processing models, use the Pytorch workbench image. |
Minimal Python |
If you do not require advanced machine learning features, or additional resources for compute-intensive data science work, you can use the Minimal Python image to develop your models. |
TrustyAI |
Use the TrustyAI workbench image to leverage your data science work with model explainability, tracing, and accountability, and runtime monitoring. See the TrustyAI Explainability repository for some example Jupyter notebooks. |
code-server |
With the code-server workbench image, you can customize your workbench environment to meet your needs using a variety of extensions to add new languages, themes, debuggers, and connect to additional services. Enhance the efficiency of your data science work with syntax highlighting, auto-indentation, and bracket matching, as well as an automatic task runner for seamless automation. For more information, see code-server in GitHub. NOTE: Elyra-based pipelines are not available with the code-server workbench image. |
RStudio Server |
Use the RStudio Server workbench image to access the RStudio IDE, an integrated development environment for R, a programming language for statistical computing and graphics.
For more information, see the RStudio Server site. |
CUDA - RStudio Server |
Use the CUDA - RStudio Server workbench image to access the RStudio IDE and NVIDIA CUDA Toolkit. RStudio is an integrated development environment for R, a programming language for statistical computing and graphics. With the NVIDIA CUDA toolkit, you can optimize your work using GPU-accelerated libraries and optimization tools.
For more information, see the RStudio Server site. |
ROCm |
Use the ROCm workbench image to run AI and machine learning workloads on AMD GPUs in Open Data Hub. It includes ROCm libraries and tools optimized for high-performance GPU acceleration, supporting custom AI workflows and data processing tasks. Use this image integrating additional frameworks or dependencies tailored to your specific AI development needs. |
ROCm-PyTorch |
Use the ROCm-PyTorch workbench image to run PyTorch workloads on AMD GPUs in Open Data Hub. It includes ROCm-accelerated PyTorch libraries, enabling efficient deep learning training, inference, and experimentation. This image is designed for data scientists working with PyTorch-based workflows, offering integration with GPU scheduling. |
ROCm-TensorFlow |
Use the ROCm-TensorFlow workbench image to run TensorFlow workloads on AMD GPUs in Open Data Hub. It includes ROCm-accelerated TensorFlow libraries to support high-performance deep learning model training and inference. This image simplifies TensorFlow development on AMD GPUs and integrates with Open Data Hub for resource scaling and management. |
Creating a workbench
When you create a workbench, you specify an image (an IDE, packages, and other dependencies). You can also configure connections, cluster storage, and add container storage.
Prerequisites
-
You have logged in to Open Data Hub.
-
You have created a project.
Procedure
-
From the Open Data Hub dashboard, click Projects.
The Projects page opens.
-
Click the name of the project that you want to add the workbench to.
A project details page opens.
-
Click the Workbenches tab.
-
Click Create workbench.
The Create workbench page opens.
-
In the Name field, enter a unique name for your workbench.
-
Optional: If you want to change the default resource name for your workbench, click Edit resource name.
The resource name is what your resource is labeled in OpenShift. Valid characters include lowercase letters, numbers, and hyphens (-). The resource name cannot exceed 30 characters, and it must start with a letter and end with a letter or number.
Note: You cannot change the resource name after the workbench is created. You can edit only the display name and the description.
-
Optional: In the Description field, enter a description for your workbench.
-
In the Workbench image section, complete the fields to specify the workbench image to use with your workbench.
From the Image selection list, select a workbench image that suits your use case. A workbench image includes an IDE and Python packages (reusable code). If project-scoped images exist, the Image selection list includes subheadings to distinguish between global images and project-scoped images.
Optionally, click View package information to view a list of packages that are included in the image that you selected.
If the workbench image has multiple versions available, select the workbench image version to use from the Version selection list. To use the latest package versions, Red Hat recommends that you use the most recently added image.
NoteYou can change the workbench image after you create the workbench. -
In the Deployment size section, select one of the following options, depending on whether the hardware profiles feature is enabled.
-
If the hardware profiles feature is not enabled:
-
From the Container size list, select the appropriate size for the size of the model that you want to train or tune.
For example, to run the example fine-tuning job described in Fine-tuning a model by using Kubeflow Training, select Medium.
-
From the Hardware profile list, select a suitable hardware profile for your workbench.
If project-scoped hardware profiles exist, the Hardware profile list includes subheadings to distinguish between global hardware profiles and project-scoped hardware profiles.
The hardware profile specifies the number of CPUs and the amount of memory allocated to the container, setting the guaranteed minimum (request) and maximum (limit) for both.
-
If you want to change the default values, click Customize resource requests and limit and enter new minimum (request) and maximum (limit) values.
-
-
-
Optional: In the Environment variables section, select and specify values for any environment variables.
Setting environment variables during the workbench configuration helps you save time later because you do not need to define them in the body of your workbenches, or with the IDE command line interface.
If you are using S3-compatible storage, add these recommended environment variables:
-
AWS_ACCESS_KEY_IDspecifies your Access Key ID for Amazon Web Services. -
AWS_SECRET_ACCESS_KEYspecifies your Secret access key for the account specified inAWS_ACCESS_KEY_ID.
Open Data Hub stores the credentials as Kubernetes secrets in a protected namespace if you select Secret when you add the variable.
-
-
In the Cluster storage section, configure the storage for your workbench. Select one of the following options:
-
Create new persistent storage to create storage that is retained after you shut down your workbench. Complete the relevant fields to define the storage:
-
Enter a name for the cluster storage.
-
Enter a description for the cluster storage.
-
Select a storage class for the cluster storage.
NoteYou cannot change the storage class after you add the cluster storage to the workbench. -
For storage classes that support multiple access modes, select an Access mode to define how the volume can be accessed. For more information, see About persistent storage.
Only the access modes that have been enabled for the storage class by your cluster and Open Data Hub administrators are visible.
-
Under Persistent storage size, enter a new size in gibibytes or mebibytes.
-
-
Use existing persistent storage to reuse existing storage and select the storage from the Persistent storage list.
-
-
Optional: You can add a connection to your workbench. A connection is a resource that contains the configuration parameters needed to connect to a data source or sink, such as an object storage bucket. You can use storage buckets for storing data, models, and pipeline artifacts. You can also use a connection to specify the location of a model that you want to deploy.
In the Connections section, use an existing connection or create a new connection:
-
Use an existing connection as follows:
-
Click Attach existing connections.
-
From the Connection list, select a connection that you previously defined.
-
-
Create a new connection as follows:
-
Click Create connection. The Add connection dialog opens.
-
From the Connection type drop-down list, select the type of connection. The Connection details section is displayed.
-
If you selected S3 compatible object storage in the preceding step, configure the connection details:
-
In the Connection name field, enter a unique name for the connection.
-
Optional: In the Description field, enter a description for the connection.
-
In the Access key field, enter the access key ID for the S3-compatible object storage provider.
-
In the Secret key field, enter the secret access key for the S3-compatible object storage account that you specified.
-
In the Endpoint field, enter the endpoint of your S3-compatible object storage bucket.
-
In the Region field, enter the default region of your S3-compatible object storage account.
-
In the Bucket field, enter the name of your S3-compatible object storage bucket.
-
Click Create.
-
-
If you selected URI in the preceding step, configure the connection details:
-
In the Connection name field, enter a unique name for the connection.
-
Optional: In the Description field, enter a description for the connection.
-
In the URI field, enter the Uniform Resource Identifier (URI).
-
Click Create.
-
-
-
-
Click Create workbench.
Verification
-
The workbench that you created is visible on the Workbenches tab for the project.
-
Any cluster storage that you associated with the workbench during the creation process is displayed on the Cluster storage tab for the project.
-
The Status column on the Workbenches tab displays a status of Starting when the workbench server is starting, and Running when the workbench has successfully started.
-
Optional: Click the open icon (
 ) to open the IDE in a new window.
Next steps
The following product documentation provides more information on how to develop, test, and deploy data science solutions with Open Data Hub.
- Develop and train a model in your workbench IDE
-
Working in your data science IDE
Learn how to access your workbench IDE (JupyterLab, code-server, or RStudio Server).
For the JupyterLab IDE, learn about the following tasks:
-
Creating and importing Jupyter notebooks
-
Using Git to collaborate on Jupyter notebooks
-
Viewing and installing Python packages
-
Troubleshooting common problems
-
- Automate your ML workflow with pipelines
-
Enhance your projects on Open Data Hub by building portable machine learning (ML) workflows with AI pipelines, by using Docker containers. Use pipelines for continuous retraining and updating of a model based on newly received data.
- Deploy and test a model
-
Deploy your ML models on your OpenShift cluster to test and then integrate them into intelligent applications. When you deploy a model, it is available as a service that you can access by using API calls. You can return predictions based on data inputs that you provide through API calls.
- Monitor and manage models
-
The Open Data Hub service includes model deployment options for hosting the model on Red Hat OpenShift Dedicated or Red Hat OpenShift Service on AWS for integration into an external application.
- Add accelerators to optimize performance
-
If you work with large data sets, you can use accelerators or accelerated hardware, such as NVIDIA GPUs, AMD GPUs, and Intel Gaudi AI accelerators, to optimize the performance of your data science models in Open Data Hub. With accelerators, you can scale your work, reduce latency, and increase productivity.
- Implement distributed workloads for higher performance
-
Working with distributed workloads
Implement distributed workloads to use multiple cluster nodes in parallel for faster, more efficient data processing and model training.
- Explore extensions
-
Working with connected applications
Extend your core Open Data Hub solution with integrated third-party applications. Several leading AI/ML software technology partners, including Starburst, Intel AI Tools, and IBM are also available through Red Hat partners and IBM Partner Plus Directory.
Additional resources
On the Resources page of the Open Data Hub dashboard, you can use the category links to filter the resources for various stages of your data science workflow. For example, click the Model serving category to display resources that describe various methods of deploying models. Click All items to show the resources for all categories.
For the selected category, you can apply additional options to filter the available resources. For example, you can filter by type, such as how-to articles, quick starts, or tutorials; these resources provide the answers to common questions.